Sew a Wheat Warmer

I had some lovely leftover fleece from making one of my niece’s a leopard print cape last Christmas, so I decided to use it to make some lavender wheat warmers for myself and others. I find wheat warmers are really useful when you feel a bit sore or stiff and I had been using a very old shop bought one for years to manage my chronic health symptoms before getting round to making this one. Once you have made it, all you need to do is pop it in the microwave for up to 120 seconds if less than 800 Watt, or up to 100 seconds if your microwave is 800-1000 Watt.  It can help to put a small mug filled with water in the microwave at the same time to provide a bit of moisture (just in the microwave with it, not poured over it!) What you need What you need: 45 x 29 cm (18 x 11.5 inches) fabric - I used fleece 750g of dried wheat 2 tablespoons of dried lavender In addition to the usual sewing items, you will need a funnel or something similar to fill the warmer with wheat (I used the cardboard in the middle of a finished toilet roll) as well as a bowl and scales to mix the dry ingredients. 1. Fold and pin the fabric Fold your fabric in half lengthways, right sides together, so that the long ends meet. Pin or peg along the raw edges. 2. Sew together the sides and ends of the wheat warmer With a 1cm (1/2 inch) seam allowance, stitch around the three open sides, leaving a gap at one of the short ends for turning right side out/ stuffing. 3. Trim and turn right sides out Trim the corners slightly and turn right side out. 4. Mark a line in the middle of the wheat warmer With a few pins, mark a line in the middle of the wheat warmer which is parallel to the long sides of the warmer. You may find it easier to then tack the line in place, especially when using a bulky fabric like fleece. 5. Stitch centre line Stitch along the marked line, starting and ending about 7.5cm (3 inches) from the short ends of the warmer. 6. Prepare the filling Mix around 750g of wheat with 2 tablespoons of dried lavender in a bowl. 7. Fill the wheat warmer Using a funnel and spoon, gradually fill the warmer with the mix. 8. Sew up the opening Slip stitch the opening closed. Variations: Vary the size and shape depending on how you wish to use the warmer – you may wish to make it circular or thinner – just remember to scale the amount of dry ingredients! These instructions include adding a line of stitching in the middle of the length of the warmer, but you could leave this step out. Alternatively, you could add another line or two of stitching or stitch lines the other way…

Continue ReadingSew a Wheat Warmer

Sew your own dishcloths

Recently, my mum got into making her own dishcloths to be a bit more sustainable.  Also, they’re great for using up scraps of fabric you have left from other projects!This dishcloth is simple to make.  It uses a bit of hessian (burlap) for one side for when you need a more abrasive side which won’t damage any non-stick surfaces.  The softer side is simply cotton, and can be made from any of your favourite remnants.To make them as sustainable as possible, you need to use 100% natural fibre fabrics and thread.  This will ensure that the dishcloth can biodegrade.  Here, I have used cotton fabric as I have loads of remnants of this, but another natural fibre such as linen would work just as well.If you’d like to make a few dishcloths, either for yourself or to gift to others, I’d recommend making a cardboard template to make it easier to cut out a batch. What you need The following would make a 9cm x 14cm dishcloth11cm x 16cm remnant of hessian / burlap fabric (for the non-scratch scourer side)11cm x 16cm remnant of 100% plain cotton (for the middle of the cloth)11cm x 16cm remnant of 100% cotton fabric (for one side of the dishcloth)100% cotton threadSeam allowances are 1cm 1. Layer the fabrics Place the fabric you wish to have as the soft side of your dishcloth right side down onto the piece of hessian.Next, place the plain piece of fabric you wish to use for the middle of the dishcloth on top so that the main cotton piece is now sandwiched between the plain cotton fabric and hessian.Pin or peg the pieces together. 2. Sew the layers together Leaving a large enough gap for turning right side out, sew all three layers together using a 1cm seam allowance. 3. Clip corners and turn right side out Clip the corners to reduce seam bulk, and then turn right side out, ensuring the corners are pushed out. 4. Top-stitch Sew two lines of topstitching.  Stitch one line close to the edge – this will mean that you won’t have to slip stitch the opening shut.  The second line of stitching can be parallel to this line, furth in from the edge. 5. Add a couple (or more!) lines of stitching across the cloth To keep the three layers secure in the middle, sew a couple of lines of stitching in whatever pattern you would like. Watch it on the Vlog I've linked my video for this tutorial below:https://youtu.be/jwKo74zz7uA

Continue ReadingSew your own dishcloths

Pattern Review: The TATB Bow Blouse

Today I’m sharing a pattern review of one of my #2018makenine projects!  I added it to my make nine list as it’s something I began in 2017 and then abandoned when I got confused with it.  However, I am so glad I persevered as it wasn’t so bad after all and it certainly stands out in my wardrobe.

(more…)

Continue ReadingPattern Review: The TATB Bow Blouse

#sewmystyle – April – Bridgetown dress

Once again, I found myself blundering out of another month without a completed project for #sewmystyle.  My flaw in April was that I completely forgot to prewash the fabric until the day I chose to cut out the pieces.  I ended up washing it while I cut out pieces for another project on my list, and then with other deadlines appearing, April came and went! (more…)

Continue Reading#sewmystyle – April – Bridgetown dress

The Walkley Dress

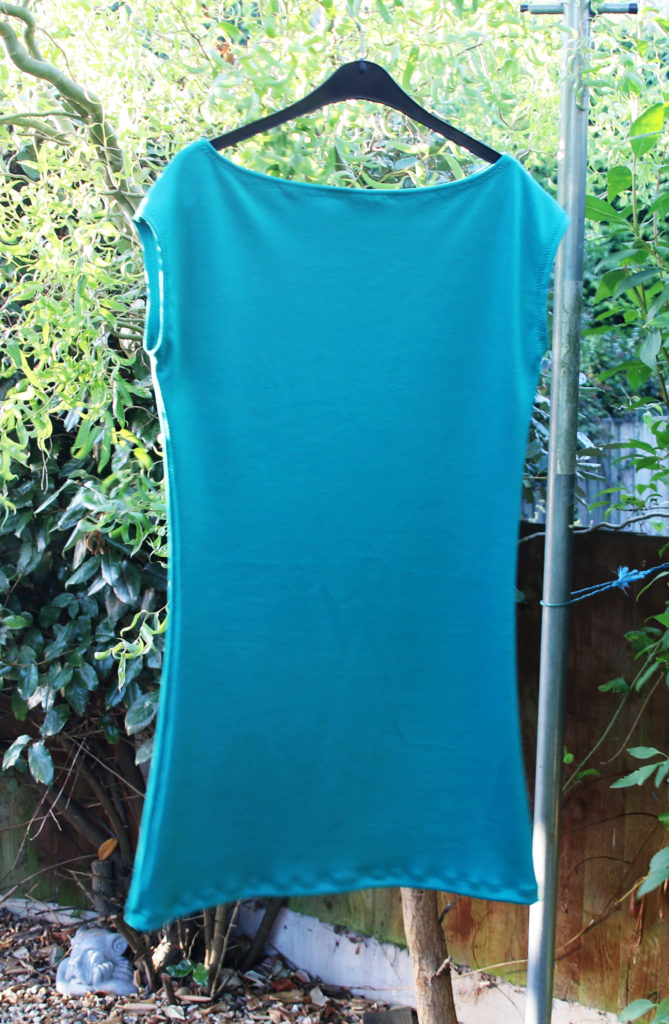
While on a bit of a dressmaking roll, I decided to delve back into the realm of knit fabrics.  Having only made one successful garment with knit, I decided that I wanted to keep the pattern as simple as possible. The simple question for this project was The Walkley Dress by Wendy Ward MIY. This pattern requires two pieces to be cut out of your fabric, and they come from the same template.  If you're lucky enough to have 150cm wide fabric, you only need a metre!  In this instance, I already had some fabric ready and waiting - a remnant from a fabric shop! Setting up the machine proved the most difficult part.  It's been about six months since I last tried a stretch pattern, and it was a challenge to set up my machine.  Following the advice from the pattern, I opted for the small zigzag stitch for the seams, and the three stitch zigzag for the hems.  In addition, I attached a walking foot to my machine and loosened the pressure of the presser foot; without these adjustments, my machine did not want to stitch! Originally, I planned to try a twin needle on the hems, but I managed to break my stretch needle one a while ago and haven't replaced it yet.  It turns out that I keep loosening the needle whenever I attach the walking foot to my machine! I didn't colour match the thread for this garment as I had recently acquired a set of threads in different colours (none of which were a perfect match) and I didn't want to go out and buy more supplies on this occasion.  The downside to this is that the hemming is a lot more noticeable than it would have been. Also, I stretched the hem a bit while stitching (I did the hem before the neck and armholes).  I didn't have any stay tape or stabiliser, which could have helped to prevent this, but I did adjust my stitching technique to decrease the amount of stretching after noticing the issue on the hem. The neckline is quite wide (though this could be in part due to my stitching ability!) but it's really comfy and it is definitely a pattern which provides you with fast results which are satisfying!  It's a brilliant 'first knit' pattern too as there aren't too many steps or seams to stitch which means you can focus on working carefully with the knit medium. I think next time I use this pattern, I will definitely try out some knit stay tape to ensure that the garment lasts a long time.  Also, I think I may opt for a patterned material. I think I will give this pattern another go with the lessons learnt from this occasion in mind!  As it only requires a metre of fabric to create a whole dress, and can be made in less time than a lot of the other patterns I have, I think another one will be made!  As…

Continue ReadingThe Walkley Dress