The £2.50 Dress
I went to my mum’s house with the intention of making a pattern from an old dress I have of hers (which is at risk of disintegrating as it’s been worn so many times!) but I ended up nabbing one of her most recent charity shop pattern purchases and cutting out the pieces to make a dress! (more…)
#sewmystyle – April – Bridgetown dress
Once again, I found myself blundering out of another month without a completed project for #sewmystyle. My flaw in April was that I completely forgot to prewash the fabric until the day I chose to cut out the pieces. I ended up washing it while I cut out pieces for another project on my list, and then with other deadlines appearing, April came and went! (more…)
Pyjama bottoms!
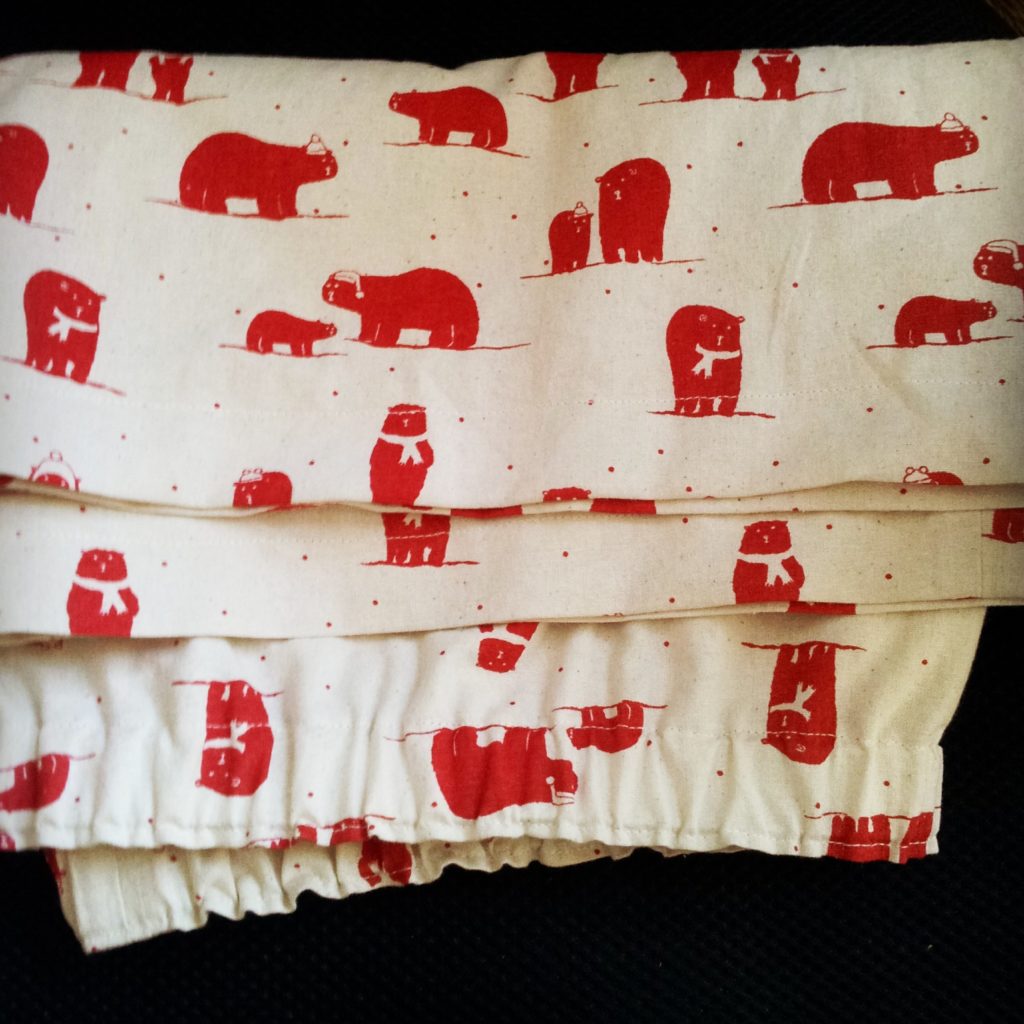
I don't make a lot clothes-wise for my boyfriend... the thought of making a shirt is quite daunting (he has a lot too). The only item I have made in ten years is a onesie funnily enough, which I made the day before Christmas Eve manically on my mum's sewing machine. It is the biggest gift I've made him, and it would be more impressive garment I've made... if I hadn't cut half the pieces the wrong way round on the fleece! Making pyjamas for him has been on my list for a while. However, I found this lovely bear print woven fabric at the stitching, sewing and hobbycrafts show last month which I knew he would like, so I decided that it was time to get this gift idea off the list. The main issue with making clothes for someone else even - even when you are making something quite simple like elasticated pj bottoms - is making sure they fit right. Fortunately I knew the inner leg measurement from trouser shopping in the past, but it was tricky to gauge the waist measurement beyond requesting a tactical hug! Even with the leg length, I ended up making them a little longer out of fear that if they were too short, I couldn't remedy that scenario as easily as if they ended up too long. I cut the fabric one afternoon and began stitching the first couple of stages, but had to shut myself away to finish them off the next day. It was good to have a short time frame to be able to make them as it meant I spent less time worrying and more time making. I found and bought a suitable top to match on this occasion. They were well received and I enjoyed making him something practical. next time, I think I will try out a summer set (at least leg length isn't required for shorts which eliminates one issue) and perhaps by then I will be confident enough with knits to make the top too!
The stitching, sewing and hobbycrafts show!
Last Saturday, I went to the stitching, sewing and hobbycrafts show at Westpoint, Exeter, UK! My friend and I went as part of a day coach trip to avoid the prospect of driving. Unfortunately, the pick up point was not in our town, so we had to get a lift to Truro. When we arrived, there was a queue which wandered around the building! Once in, we decided to dive into the middle aisle which seemed quieter as others opted to choose to tackle the show from one end to the other. The first fabric shop we saw was Fabrcis Galore, which contained an array of wonderful fabrics. After deliberation, i went back later to buy some printed corduroy, which will be perfect for a project I have in mind to make after all the Christmas gifts are made (so probably January)! Also I picked up a lovely polar bear print from another fabric shop, which will be used in a gift I need to make very soon (currently being prewashed so no photo)! My very first purchase was this fleece. As the nights draw in, I think I will turn to practising spinning with my drop spindle once more, and I like to pick up small amounts of fleece for this purpose. I'm not a fast spinner, so this bag is a suitable size. We managed to sign up to a wonderful glass workshop with The Glass Garden Studio where we learned the basics in stained glass construction. I took home this angel that I made. Tactile Treasures was another stall I was particularly interested in. Now I have a niece, I am interested in making toys which will be perfect for her learning and development. this stall sold all sorts of attachments which are teething friendly and different stitchable surfaces, such as this mirror, which can be cut, stuck and appliqued onto items. I bought some rattle inserts too which will be great to use, and received excellent tips from the owners of the business on ensuring that the toys you make a safe and meet safety standards. I came across an air erasable pen, which is something I have been looking out for having read about them. I've been having a bit of trouble with water erasable pens, which have at times caused the thread to run onto the background fabric. I'm not sure they this has happened as the thread should be colour fast, but I am intrigued to find out whether the use of an air erasable pen would be safer. I plan to review this in the coming month. The block printing stall from The Arty Crafty place was lovely as well. When we finally managed to get up to the front and admire the blocks, we were very tempted with their £30 starter pack. However, I decided to select a couple of small blocks. They were packaged in a beautiful drawstring bag. We also found some simple leaf shapes for £1 on another stall, which we…
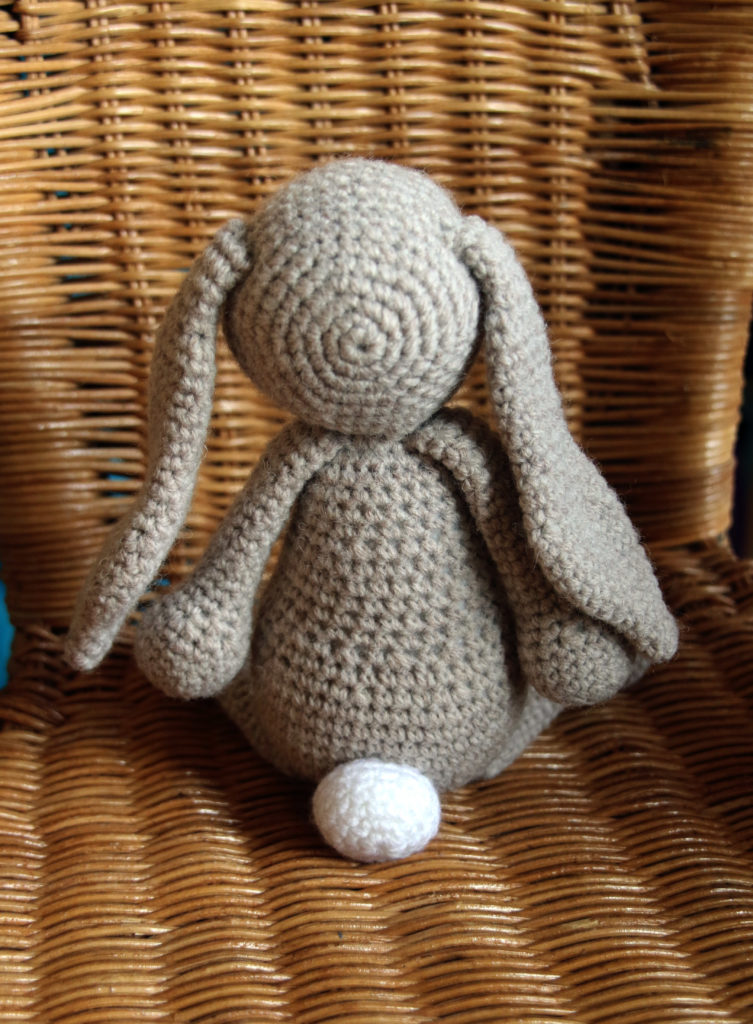
Crocheted Bunny
I haven't done a lot of crocheting beyond the string bags I make for the Etsy shop. However, this bunny pattern has been a project I've been looking forward to making for a long time. Published in Simply Crochet magazine, this bunny originates from a lovely looking book called Edward's Menagerie by Kerry Lord. I made this bunny with Sirdar Country Style yarn, which meant it had a bit of wool content but would still be easy to wash (which I felt the parents of the owner of this bunny would appreciate)! The bunny is advised to be made in alpaca wool, but I opted for a wool blend to comprimise on price/budget and yarn content. I am slightly gutted to have since discovered an alpaca wool blend wool in a shop near my mum's which would have worked well for this knit and was a reasonable price! This pattern was fun to make. I would have appreciated more pictures or directions on sewing it up, but the actual pattern in the book may have more guidance on this than the magazine version. Also, I guess it means that your finished toy will be unique according to how you decide to finish it off.
Dungarees!
When I took part in the #miymarch16 instagram challenge, I put down this dungarees pattern as my sewing ambition (new Burda 3779). I bought the pattern from a charity shop for £2 just over a year ago because I loved the idea of making some, and bought some denim shortly after. However, the amount of pieces in the pattern felt overwhelming, and I couldn't get started. A couple of months ago, I asked my mum if I could bring along the pattern and fabric when I visited her to see if she could encourage me to get started. Over the weekend, I managed to trace the pattern, pin it onto the fabric, and then cut it out. One of my main worries was altering the pattern to my size. However, we decided that as it was designed to be very loose fitting, I could cut it a size smaller than usual, which would ensure that the bottom half would not be too baggy! I didn't manage to pick it up again for about a month after this visit! Feeling that I still needed a boost, I went back to my mum's for a crafty retreat to get the pattern finished. It wasn't as bad as I thought it would be. When I attached the bib section to the shorts, it didn't provide a completely sealed finish, but I think I might have misread it. I would plan to take steps to create a better finish next time. Also, the inner sides of the bib are tacked in place and then secured by edge stitching and top stitching. However, I decided to slip stitch it in place by hand to secure it before the two rows of machine stitching. The braces were simple to attach. The buttons have to be hammered on, but in my view, this is much easier than stitching button holes and working out where to place the buttons on the straps! There's the added benefit that you can adjust it to size. The pleats on the front were also a worry, but turned out to be really simple to complete. They were more like tucks. The denim material is so sturdy that it was easy to tack in place and press well at every step. I think these may become my 'uniform' for craft days! I think I will have to make a trouser version for the winter though (I'm already imagining some navy polka dot material which could be used for the second pair...)Harry did become jealous of the sewing project during its production, and kept sitting or laying on the instructions. When I moved the instructions out of the way so he couldn't make any further holes in it with his claws, he decided to settle on the garment instead!

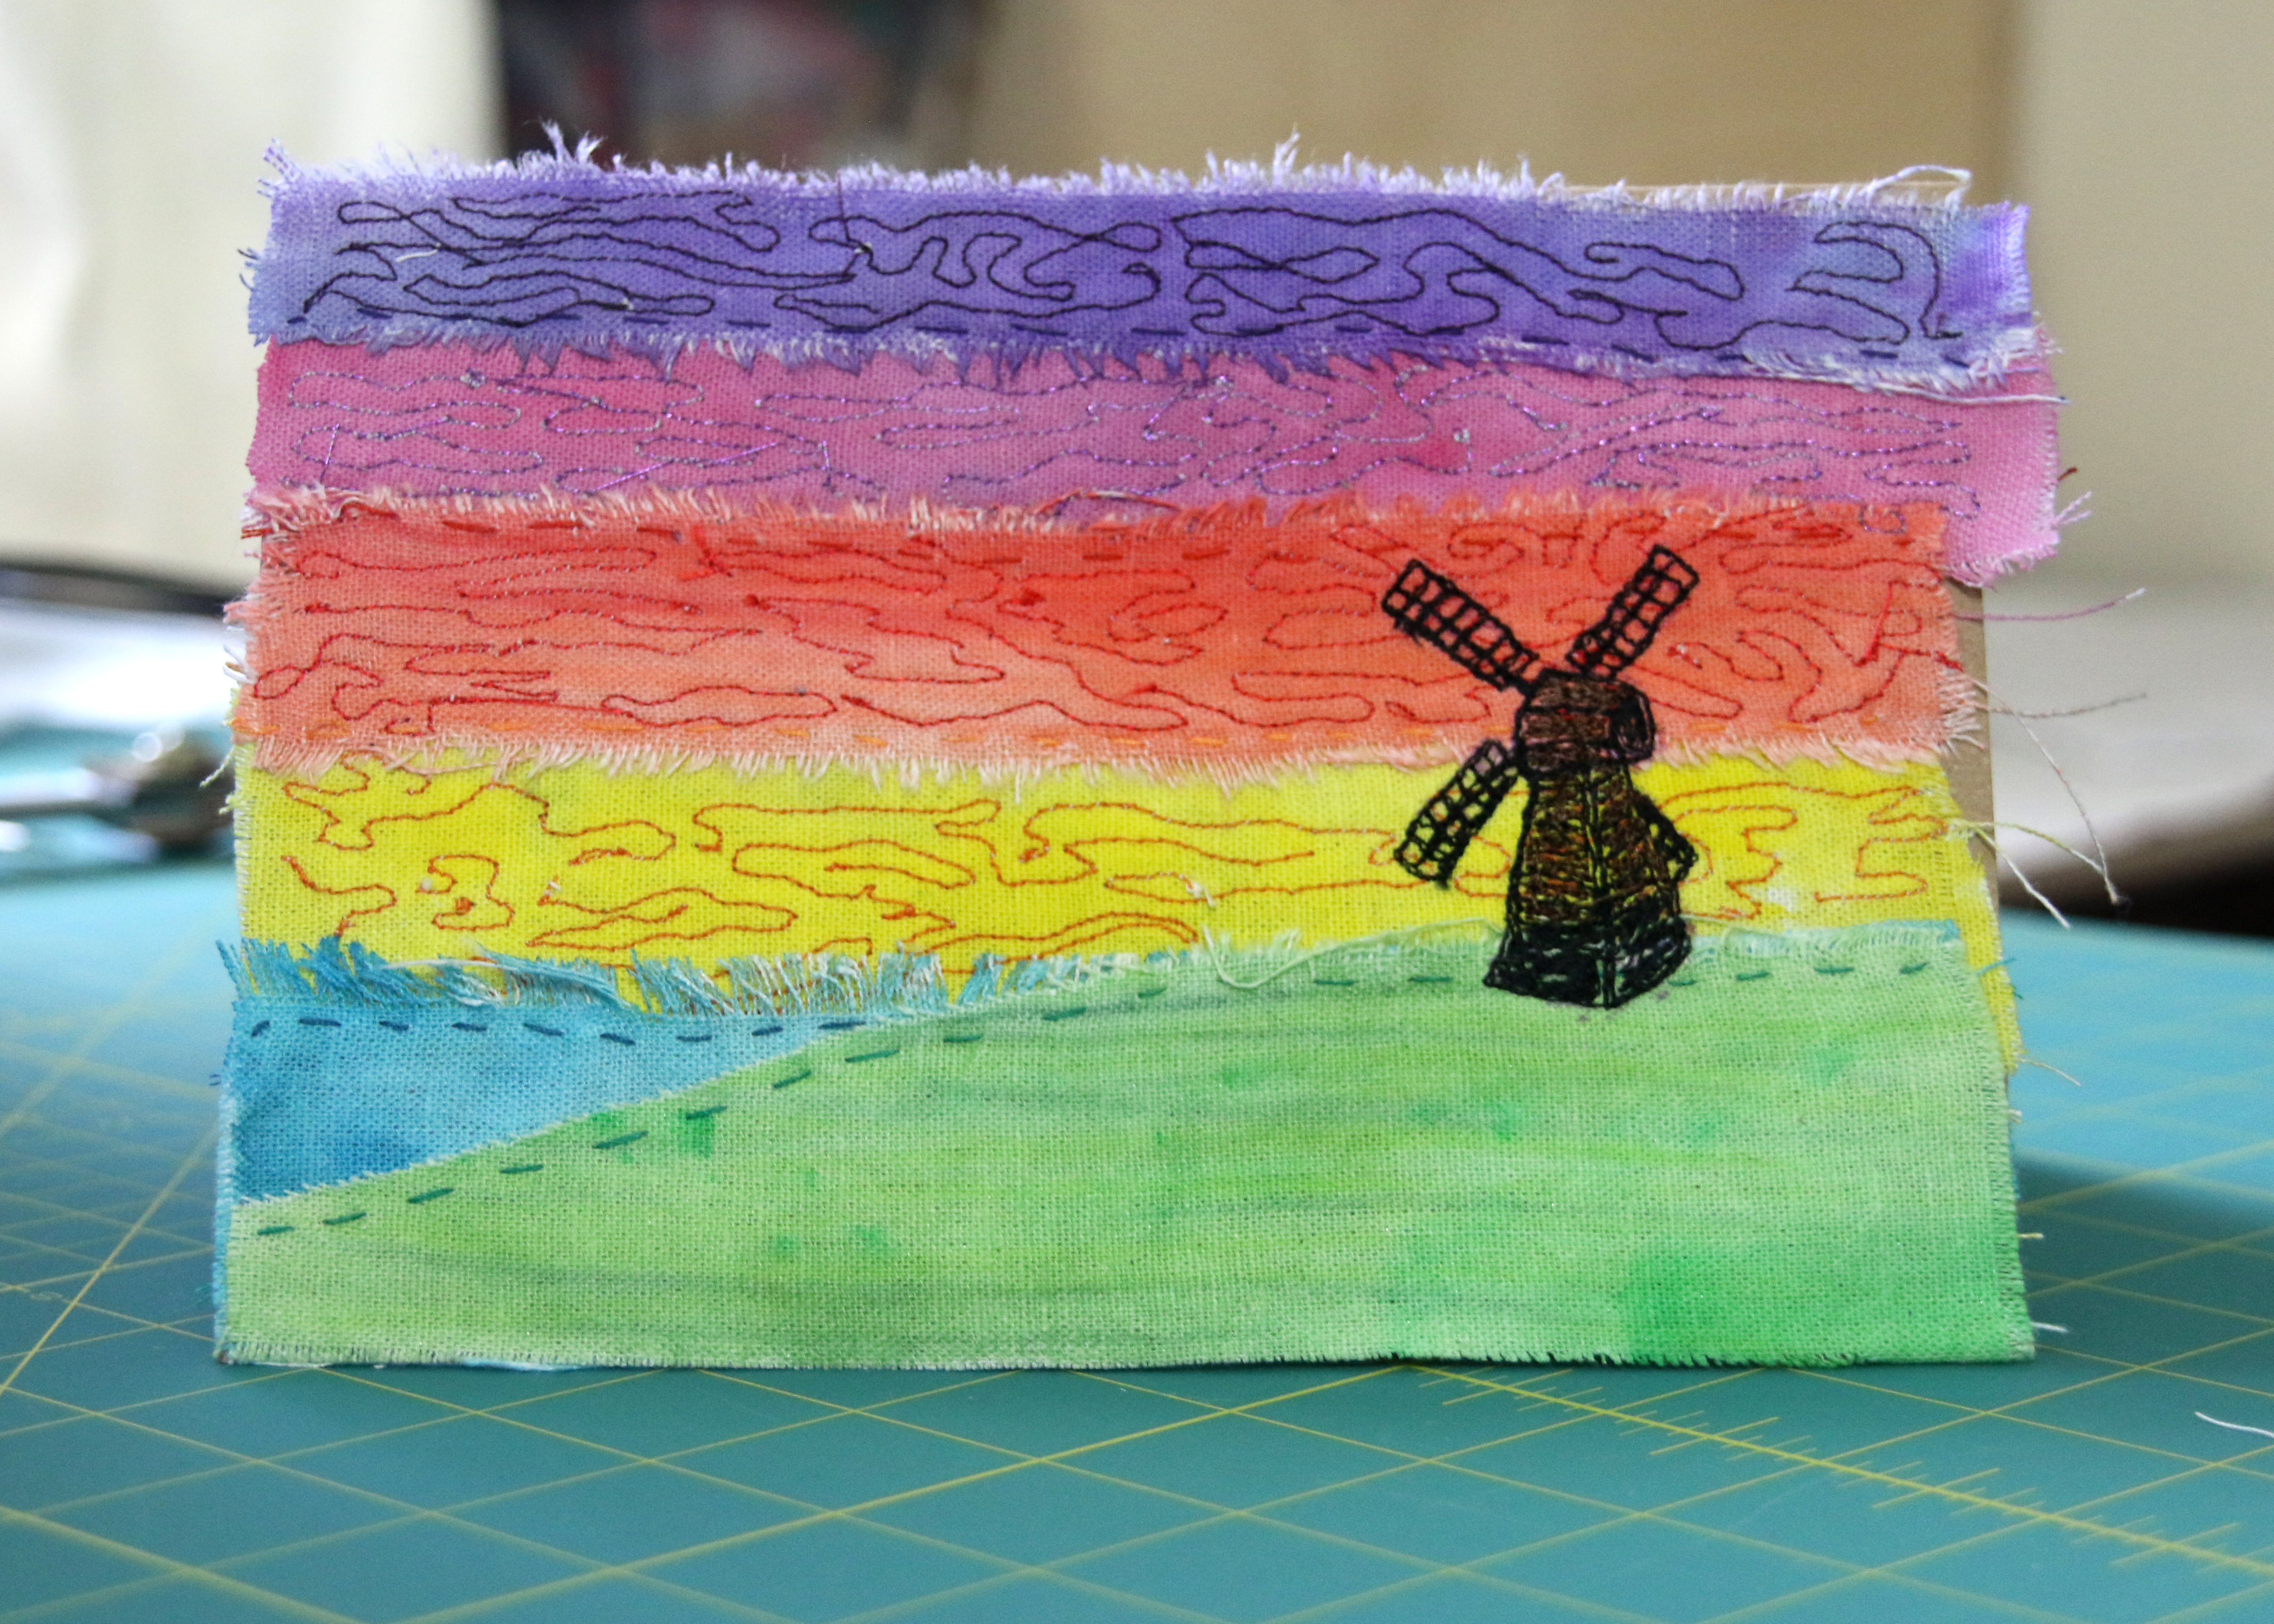
Stitching Cats
I haven't made a lot recently, as I have been finishing up a couple of craft courses I took this year. However, I have got around to practising free machine embroidery again. I'm very fond of pets, and regularly doodle my cats, Harry and Fizz. I decided to have a go at designing some more cat images to frame or turn into cards. I like the use of appliqué to add another dimension to the stitched cat, as shown on the far right. However, I like the simple line drawing on the left, and am reluctant to add any shading or colour to it. The middle images are coloured in with fabric dye sticks and paints. They are all very different in style! The middle ones are much more cartoon-like. However, the tabby and black and white cat are much more personal, as they look like Harry and Fizz!
Completed PHD: Pyjama pattern from The Makery
After a review of my work practices, I decided that it was time to stand up and confront my PHDs (projects half done)! The list of incomplete projects is threateningly high so I decided that this list needed to be dealt with (or at least cut back a bit!) Enter Simply Sewing Magazine's exclusive pattern from The Makery - pyjamas. I think I began this pattern last August and then became distracted by a looming deadline for something else. I'd cut all the pieces out and even sewn a couple of sections for the shorts but then put it away until now. This project has been a good introductory one for tackling the PHDs because as the cover of the pattern boasts, it's an "easy sew". I was a bit thrown off by the shorts being made out of two pieces instead of four, but once I got my head around it, the pattern was even easier than anticipated. I haven't done much gathering, and I feel that it shows on the final piece. However, as they are pjs, this doesn't matter much and it's been a good way to practise gathering as a skill. The gathering works well for shaping, and personally I think the fit is good for this make. I could have done with cutting the ribbon for the shorts waistband a little longer than instructed. I needed assistance for fitting the straps as well. Overall, a lovely weekend project!

Upcycling jeans – the sewing pinny!
One of the projects I made during #miymarch16 was the upcycled pinny from an old pair of jeans. I got these jeans for my 21st. I'm a bit of a hoarder, and while they had a tear in them where the fabric was so thin and worn out, I hadn't had the heart to chuck them away. When I met up with my mum and sister in March, they suggested cutting them up into something new. Due to the location of the worn out section, a skirt was not suitable! However, we came up with making a tool belt. One of the best parts of making something from something you're prepared to throw away is that it doesn't cost you anything and you have a lot of freedom to just go for it! I simply placed a ruler over the jeans roughly where I thought the length would be good and took a rotary cutter to it! As you can see, I curved the back to make it more apron like, but also so I could keep the back pockets. Jeans lend themselves to being a belt because of all the pockets!! I added some patches to the back pockets and then added a pom pom trim and ribbon border. I wanted to add more decoration, and following my recent addiction to free machine embroidery (which I will go into more detail at some point in the future), I drew out some sewing related appliqué onto bondaweb! Et voila! Here is the end result! I added some random buttons to the front pockets and stitched additional detail on the appliqué. Now I put my scissors on a bungee rope so they're always with me but I do think I need to add a scissor holster to it to improve it.