#mmmay16 – Me Made May and the versatile wardrobe

Me Made May is an event created by Zoe from So Zo… ‘What do you know?’ to encourage people to wear the clothes they make, whether this is through knitting, crocheting, sewing, weaving, etc.  It’s designed to motivate crafters to celebrate their achievements and confront any perfectionistic thoughts which may be keeping some garments in the back of the wardrobe!

There’s no pressure to wear something everyday, or to charter your progress through social media.  The challenge is an individual one set by you.

I didn’t officially sign up this year (mainly because I didn’t read the post properly to see that you needed to add a comment to sign up) but went along with it anyway.  The challenge I found with #mmmay16 was that I have made a lot of summery dresses and May in the UK this year has been quite cold at times!  I did set an achievable goal – to wear something me made on a couple of days each week in May – but I found that the most versatile garment in my me made wardrobe is the knitted cardigan I made 3 years ago in double knit weight yarn!

cardigan


The second garment I wore the most was the top I made as part of #miymarch16 for the knit material day.  This top was great as I could layer it up depending on the weather!

Other items I wore was the dress I made during #miymarch16 and the wrap skirt, which was good for the warmer days of the month!

This challenge has made me reflect on the type of garments I make.  I can see that although it took a good couple of months to make my knitted cardigan, the pattern was a good one and I wear it a lot.  Also, I have tended to stick to simpler patterns with easy to use fabrics which are more suitable for hot summer days in my dressmaking experience.

As a result, it looks like I need to diversify my dressmaking challenges.  here are the ways I am going to do this:

  • Make more tops in knit materials
  • Make more tops in specially selected materials
  • Make more items for all year or in particular Autumn, Winter and Spring
  • Learn to make fitted trousers
  • Make more knitted cardigans!

It will be interesting to take part next year and see if there’s any progression!

Continue Reading#mmmay16 – Me Made May and the versatile wardrobe

Free Motion Embroidery – drawing and writing with my sewing machine

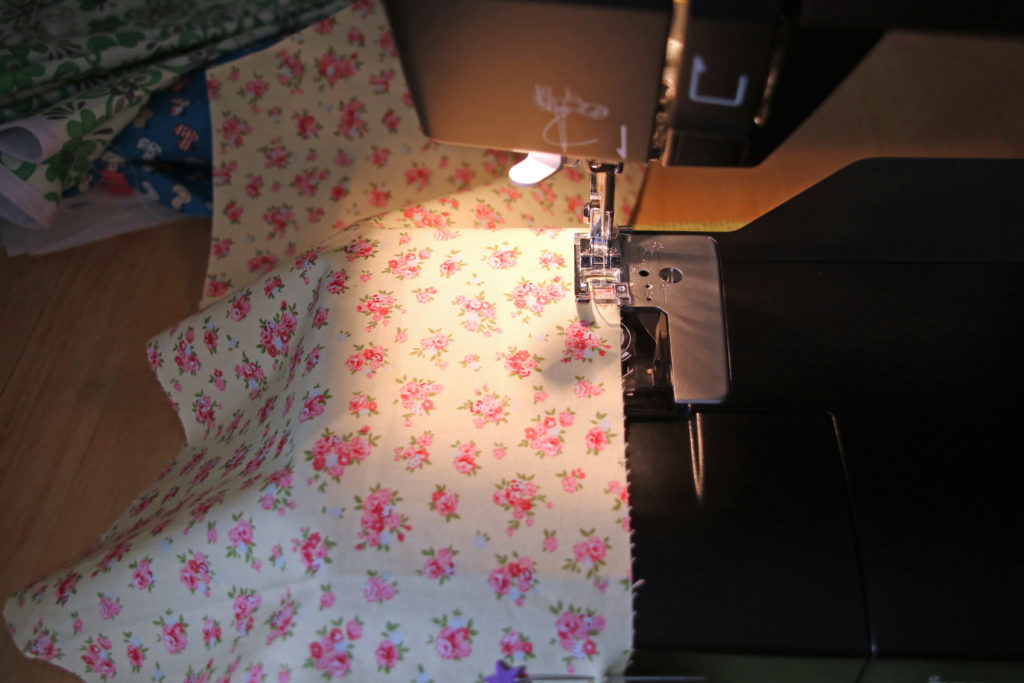
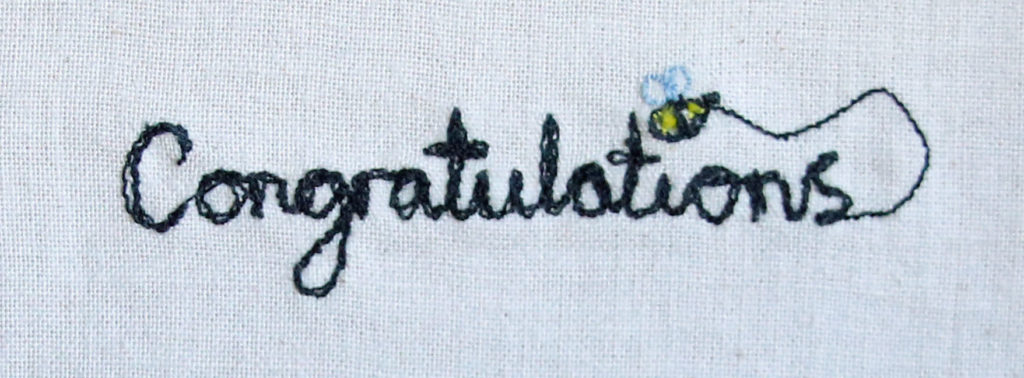
Got your eye on an expensive yet impressive embroidery sewing machine?  Think again!

I’ve been admiring the lovely embroidery machines with their numerous stitch options and the possibility of embellishing handmade gifts with a name at the touch of a button (or a few).  I remember watching a demonstration of someone programming in a word and then watching in awe as the machine punched out the letters perfectly.  All I wanted to do was justify the cost of buying a sewing machine which did this!

Well, my bank budget (and boyfriend) will be relieved to know that I no longer have this impulse!  While embroidery machines are amazing – especially the ones where you can put your design into the computer and then transfer it to the machine to stitch it – I discovered free machine embroidery this year through a local course.

I signed up to this course without much thought about what it entailed.  I’ve always wanted to do a textile based course, but they’ve always been a long commute away or I hadn’t been able to justify the cost at the time.  This course was a reasonable price, within walking distance, and with my new working hours, I could make the time of the session.

Free machine embroidery (also known as free motion embroidery) is when you drop the dog teeth on your sewing machine, which normally propel your fabric in one direction (away from you).  You attach a new type of foot – a darning foot – and reduce the upper thread tension a little.  You can do it without a presser foot attached, but it’s a lot safer with one!  You use an embroidery hoop to keep your material firm and you’re ready to go!

It’s best to move the hoop really slowly and have a play at first.  It takes time to learn to keep your hands smooth and steady as you stitch.  Originally, I practised drawing lines with the machine, then made loop patterns and some basic shapes.

first attempt
My first attempt at free motion embroidery!

In the course, we learned shading, appliqué, writing and using water soluble fabric (which is a whole other aspect to discuss another time).

IMG_20160326_085029
Some shading added to this cat drawing
applique
Some abstract layering of different fabrics using appliqué and free motion embroidery

I really enjoyed all of it, but I am quite fond of writing with stitch.  I love looking at people’s handwriting, and I used to enjoy writing stories as a kid, which may explain my fondness of handwriting.  I have used writing in combination with other free motion embroidery techniques in producing the designs for some of my Etsy items– cards in particular.

Ultimately, the reason I’m addicted to free motion embroidery is that it is creates personality and individuality in makes.  Embroidery sewing machines are programmed to be perfect, but I am always going draw something with stitch a bit different every time I use it, which makes it more interesting.

It’s also a great stash buster!

Here are some useful resources and artists to look at if you fancy a go:

  • Craftsy has a useful ‘how to’ on creating embroidered works of art.  It’s very clearly laid out in simple steps
  • Poppy Treffrey does some lovely free machine embroidered items, focusing mainly on the seaside and animals
  • Lou Gardiner is another amazing free machine embroiderer and describes how she creates her work well on the introductory video on her site
  • Jane Hall focuses on nature in her work
  • Rosie James has a lovely book on drawing with stitch
Continue ReadingFree Motion Embroidery – drawing and writing with my sewing machine

The Poppy Playsuit

Once again, it’s been a while since I’ve had another go at dressmaking.  I remedied this by combining a recent pattern in Simply Sewing with a recent material purchase!

There’s a lovely charity shop nearby who sell craft supplies.  I was very lucky to go into the shop when they had a material sale on, which meant I got two fabrics for the price of one!  One of the fabrics I came across is this lovely one above.

I am not sure what type of material it is, but it drapes well and there was enough to try out the Poppy Playsuit by Sew Over It, which came with issue 16 of Simply Sewing.  The main criteria for the material for this pattern was one which drapes well so I had the perfect match!

This is the first pattern I have tried making a basic alteration with.  I found that the bust and waist measurements were close enough to one pattern size, but my hips definitely needed a smaller size.  The pattern pieces did not highlight where the hipline was, which was a shame, but I still made a basic alteration from the waist to one of the notches which I felt was close to the hip measurement area.

The fabric was a challenge to cut out as it moves easily – I found that pattern weights and then pinning it helped.  The pattern’s instructions suggested pinning the edge of the fabric too, which was a useful tip.

As I was concerned about the material moving too much, I pinned and tacked at every stage.  Tacking increases the time considerably, but it did mean that I didn’t have any major unpicking sessions!

The pattern directions are clear and and concise.  Key terms are defined, which saves a google search part way through your make!  The only section I had to re-read again was how to do the turn-ups, and they turned out to be really simple once I focused on the directions carefully.

The only bit of unpicking I had to do was related to the hook and eye.  I attached the hook so that it would meet the edge of the right hand side opening.  This caused a gape in the material when fastened.  I changed this by placing the hook on the very edge of the right hand side opening and put the bar further in on the left hand side.  Also, I didn’t read the pattern carefully when attaching the facing and did a 1.5cm seam allowance instead of 1cm!

I was surprised by how long it took me to make this item, but that’s mainly because (a) I’m rusty at dressmaking and (b) the material required more care than a standard cotton or linen.  However I think it’s well worth it and I look forward to some warmer weather soon so I can wear it!!  I would definitely complete this pattern again, and I expect I would find it even easier and faster second time round.

Although it took some time, this pattern is great for beginners because (a) there are only 4 main parts to the pattern, (b) no darts, (c) the shaping and fastening is the hook and eye and elastic casing at the waist, which means no zips or buttonholes.  The fabric really helps to define its shape, so as long as you get that right, you’ll end up with a lovely addition to your wardrobe!

Continue ReadingThe Poppy Playsuit

My first sew with knit material – the simple top

Here is another make from my #miymarch16 activity!

IMG_20160324_224240

To ease my nerves, I read up for some basic tips on sewing with knit fabrics with the help of Tilly and the Buttons’ blog post and Smarmyclothes’ youtube video.

The pattern – McCall’s 9399

top pattern

I got this pattern in a charity shop for a bargain price – I’m not even sure I paid the £1.99 penned onto the front!  I chose design E as I quite like a high-ish neckline, although I was tempted by the asymmetrical option, and H, which has a slightly lower neckline.

I didn’t want a complicated first knit project, so I felt that this pattern would be simple enough to give it a go without using too much material and time immediately.

I needed only a yard of material for this project.  I used a stretchy material I bought from Fabricland a long time ago but hadn’t gotten around to using so I was very happy to finally bust this one out of the stash!!

The pattern suggested a double hem.  Baffled by this technique, I searched online and found this tutorial to be useful in defining what it is.  Knowing I had a twin needle, I thought “yeah!  I could do that!” and set to work to make it happen.  However, after hemming the neckline, I realised that the bobbin thread was way too tight and and broke when I stretched the material.  I searched online to find out how to resolve this new issue and came across Mariadenmark’s useful post.  This enabled me to realise that I needed to increase the upper thread tension to make it work (I didn’t use interfacing as I don’t own any for knit fabrics – yet).

Things I learned from this project:

  1. Prior research helped a lot! If I hadn’t learned the basic tips of how to prevent it stretching, the needle to use, and the stitch types which can be used, I would have been stuffed as I would have been easily mislead by the pattern’s instructions and guidance as it looks like they suggest a straight stitch…
  2. The double needle gives a nice neck edge – but it takes time to get the tension right for it to work!
  3. Use a knit machine needle!
  4. There are various stitches you can use for knit fabrics. I thought I would opt for the standard zigzag, but when it warped the shoulder seams a bit, I found that the three stitch zigzag worked much better for me and the material I was using.


Continue ReadingMy first sew with knit material – the simple top

Upcycling jeans – the sewing pinny!

One of the projects I made during #miymarch16 was the upcycled pinny from an old pair of jeans.

jeans before
A very creased pair of old jeans!

I got these jeans for my 21st.  I’m a bit of a hoarder, and while they had a tear in them where the fabric was so thin and worn out, I hadn’t had the heart to chuck them away.

When I met up with my mum and sister in March, they suggested cutting them up into something new.  Due to the location of the worn out section, a skirt was not suitable!  However, we came up with making a tool belt.

jeans initial cut

One of the best parts of making something from something you’re prepared to throw away is that it doesn’t cost you anything and you have a lot of freedom to just go for it!  I simply placed a ruler over the jeans roughly where I thought the length would be good and took a rotary cutter to it!

IMG_20160316_223414

As you can see, I curved the back to make it more apron like, but also so I could keep the back pockets.  Jeans lend themselves to being a belt because of all the pockets!!  I added some patches to the back pockets and then added a pom pom trim and ribbon border.

IMG_20160317_083739

I wanted to add more decoration, and following my recent addiction to free machine embroidery (which I will go into more detail at some point in the future), I drew out some sewing related appliqué onto bondaweb!

pinny complete

Et voila!  Here is the end result!  I added some random buttons to the front pockets and stitched additional detail on the appliqué.  Now I put my scissors on a bungee rope so they’re always with me but I do think I need to add a scissor holster to it to improve it.

Continue ReadingUpcycling jeans – the sewing pinny!

#miymarch16

#miymarch16 may have been a couple of months ago, but here are the resulting images I posted from it below.

Make it Yourself March is an Instagram event.  It involves posting an image based on the daily photo prompt – a list can be found on Wendy Ward’s blog from this year.

New to Instagram, I found this event coincided beautifully with a couple of my goals – to become more familiar with using social media and to push myself to create more.  It was a great way to be inspired by fellow dressmakers.

Instagram is an easy form of social media if you have a smart phone and I’ve carried on using it since.

During March, I made 4 dressmaking items, completed upcycling projects, planned future projects, made gifts and machine embroidered.

Continue Reading#miymarch16

Bee Themed!

One of the best parts about handmade is that you can make whatever it is you’re making personal!

This is how my bee themed gift and card came about when a couple my partner’s friends with had a baby recently.  As the father currently does work relating to bees, the gift became centered around this!

bee mobile

The crocheted bee mobile was a lot of fun to make.  I used clear nylon string to attach them to an embroidery hoop for the top of the mobile.  Acrylic yarn was used so it should be hard-wearing.

I love the little sting detail too!  They were made on the round which meant no seams to sew up!

bee card

I’ve been learning how to free machine embroider this year so I used this technique to create a simple card.  I’ll be adding an improved version of this card to my etsy shop in the next week.

Continue ReadingBee Themed!

Crafting with Family – March

It’s been a while since I have posted and my post is all about a craft meet up two months ago!

Mum’s house is quite a good meeting point for her, my sister and I to meet up.  We managed to meet up in March and here’s what we got on with:

applique in progress

Having purchased a lovely new Singer sewing machine recently, my sister put it to the test by having her first attempt at appliqué!  Not one to be daunted by a challenge, she decided to appliqué a friend’s name.  A very impressive feat, going around all sorts of twists and curves when you’re still adjusting to a new technique and how your new machine works!

cushion

The great part about this bright and colourful cushion is that it’s all made from remnants.  The main cushion is made from an ex-display curtain from a department store, with the money going to charity.  The letters were cut from a swatch book, which had been picked up the same way from the same store.

I didn’t embark on a sewing project this time, but I did finish the second sleeve to a short sleeved cardigan I began two years ago!  It’s now at the sew up stage before the neck band and button band are tackled…

doll progress

There’s the progress of my mum’s doll, which she began in our February meet up.  It’s coming together now it has a head!  She wasn’t able to progress with it that weekend, but she did hem up someone’s new net curtains by hand!

Continue ReadingCrafting with Family – March
Read more about the article Back to dressmaking!
Pinning the templates

Back to dressmaking!

I’ve been taking part in Make it Yourself March on Instagram this month by Wendy Ward and Emma Miles, which encourages you to post a sewing related photo every day in March based on a daily theme.

Within week one, I realised that I hadn’t made a dress in over a year.  To remedy this, my partner chose a pattern from my hoard – Simplicity 3833 – and suggested a fabric he found in my stash.  This is indeed a stashbusting project as it’s a remnant I picked up a year or so ago and I only just about had enough material to make it!

I really liked using this pattern.  The instructions were clear to follow in general.  I got a little bit confused on the zip directions, but then I tend to get confused when it comes to the zip stage whatever the project or pattern!

I chose the sleeve option.  I like sleeveless dresses and I think the sleeveless option would turn out great but I chose sleeves to practise them!  Considering this is my second attempt at sleeves, I’m quite chuffed!  I did forget to trace and tailor tack a couple of reference points on the sleeves template which didn’t help but I just gave it a go!

A new technique I learned with this pattern was understitching, which I had not heard of before but is great as it stops the interfacing rolling out on display on the neckline.  The pattern gave clear directions on this, but I checked online to ensure I understood it correctly.

This is the first time I’ve been able to use my tailor’s dummy for one of its main purposes – to assist with hemming!  It was invaluable.  I pinned where I wanted the length of the dress to finish and then used the pinned line as a guide to press and hem the length.

I would use this pattern again – perhaps using the sleeveless design or going for the longer sleeved version to vary it.

Continue ReadingBack to dressmaking!

Mother’s Day gift making – bath hats and bags

in progress
Taking over the lounge- there is a cutting mat underneath the template – honest!

It didn’t take long to come up with this year’s mother’s day gift – mainly because I knew she wanted a new bath hat!

I made her one years ago from the Cath Kidston “Sew!” book.  Unfortunately, the waterproof fabric I chose for inside the hat was quite thick and stiff.  Also, we have big heads so I think the pattern was designed for a smaller circumference head!

2014-12-23 23.50.14
Bath hat #2

I’d made my nan this green bath hat above using material I got online which I think is used for making tents.  It was much more versatile than the thick waterproof plastic for bath hat #1 anyway!  I made a much larger template for this hat and added a brim and bow!

finished result
Bath Hat and Toiletry set complete

As hat #2 was a much better fit, I went along with this design for mum’s.  However, I tried a new lining.  The fabric I used was a white showerproof material from Fabricland in Bristol.  I was apprehensive about using this, as I wasn’t sure how robust it was for using for practical and wearable items.  However, it seems to have turned out to be the cheapest and most shower hat like option of the three tried and tested!

Still chirpy from making a toiletry bag for my dad’s birthday, I felt that the hat required a matching toiletry bag.  As I wanted the bag and hat to match, I added a strip of the duck material to the top and appliquéd a duck on it too.  I couldn’t resist having another go at writing with the sewing machine, so I wrote “like a duck to water” on it.

I really enjoyed this gift set make.  It’s something I am considering to sell on my Etsy store in time for people preparing for their holidays!

snoopy wearing completed hat
Snoopy modelling the bath hat for demonstration purposes
Continue ReadingMother’s Day gift making – bath hats and bags